
Cluster Deployment Guide
Cluster deployment instructions
Document optimizing…
This quick start manual assists you in rapidly downloading, installing, and using Nacos in a production-ready clustered mode on your computer.
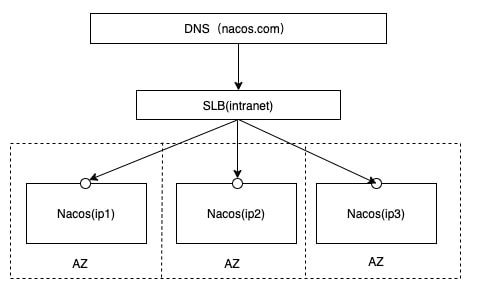
Cluster Deployment Architecture
Open-source recommendations include placing all service lists under a VIP and associating it with a domain name.
<http://ip1:port/openAPI>: Direct IP mode requires IP modification when a machine fails.<http://SLB:port/openAPI>: SLB (intranet) mounting mode is not to be exposed to the public network due to security risks.<http://nacos.com:port/openAPI>: Domain + SLB (intranet) mode is recommended for its readability and easy IP swapping.
| Port | Offset from Main Port | Description |
|---|---|---|
| 8848 | 0 | Primary port used by clients, console, and OpenAPI for HTTP requests. |
| 9848 | 1000 | gRPC client request to server port, for client-initiated connections and requests. |
| 9849 | 1001 | Server-to-server gRPC request port for service synchronization, etc. |
| 7848 | -1000 | Jraft request to server port, for handling Raft-related requests among servers. |
When using VIP/nginx, configure TCP forwarding instead of http2 to prevent connection termination by nginx. Ports 9849 and 7848 are for inter-service communication; do not expose them to external networks or clients.
1. Prerequisite Environment Preparation
Ensure the following are installed and used:
- 64-bit OS: Linux/Unix/Mac, Linux is recommended.
- 64-bit JDK 1.8+; Download. Configuration.
- Maven 3.2.x+; Download. Configuration.
- A minimum of 3 Nacos nodes to form a cluster.
2. Obtain Source Code or Installation Package
Nacos can be obtained through two methods.
Download Source Code from GitHub
unzip nacos-source.zipcd nacos/mvn -Prelease-nacos clean install -Ucd nacos/distribution/target/nacos-server-1.3.0/nacos/binDownload Compiled Package
Download from the latest stable version nacos-server-$version.zip or nacos-server-$version.tar.gz.
unzip nacos-server-$version.zip or tar -xvf nacos-server-$version.tar.gzcd nacos/bin3. Configure Cluster Configuration Files
Under the conf directory in the extracted nacos/, edit cluster.conf with each line as ip:port (minimum 3 nodes).
# ip:port200.8.9.16:8848200.8.9.17:8848200.8.9.18:88483.1 Enable Default Authentication Plugin (Optional)
Modify application.properties in the conf directory.
Set:
nacos.core.auth.enabled=truenacos.core.auth.system.type=nacosnacos.core.auth.plugin.nacos.token.secret.key=${custom, ensure consistency across all nodes}nacos.core.auth.server.identity.key=${custom, ensure consistency across all nodes}nacos.core.auth.server.identity.value=${custom, ensure consistency across all nodes}For more details, refer to Authentication.
Note: The default values
SecretKey012345678901234567890123456789012345678901234567890123456789andVGhpc0lzTXlDdXN0b21TZWNyZXRLZXkwMTIzNDU2Nzg=are public defaults, suitable for temporary testing. Replace with custom values for actual use.
4. Determine Data Source
Use Built-in Data Source
No configuration required.
Use External Data Source
Recommended for production in at least master-slave mode or with a highly available database.
Initialize MySQL Database
application.properties Configuration
5. Start Server
Linux/Unix/Mac
Standalone Mode
sh startup.sh -m standaloneCluster Mode
Built-in Data Source
sh startup.sh -p embeddedExternal Data Source
sh startup.sh6. Service Registration & Discovery and Configuration Management
Service Registration
curl -X POST 'http://127.0.0.1:8848/nacos/v1/ns/instance?serviceName=nacos.naming.serviceName&ip=20.18.7.10&port=8080'If the default authentication plugin is enabled, include credentials in the Header.
Service Discovery
curl -X GET 'http://127.0.0.1:8848/nacos/v1/ns/instance/list?serviceName=nacos.naming.serviceName'If the default authentication plugin is enabled, include credentials in the Header.
Publish Configuration
curl -X POST "http://127.0.0.1:8848/nacos/v1/cs/configs?dataId=nacos.cfg.dataId&group=test&content=helloWorld"If the default authentication plugin is enabled, include credentials in the Header.
Retrieve Configuration
curl -X GET "http://127.0.0.1:8848/nacos/v1/cs/configs?dataId=nacos.cfg.dataId&group=test