
Nacos 3.0 Source Code Packaging and Startup
Nacos Source Code Packaging and Startup
According to the provisions of the Nacos open-source license (Apache License 2.0), you have the right to modify and repackage the Nacos source code. However, when performing these operations, you must ensure compliance with its license requirements, such as retaining the original copyright and license statements.
Before packaging the Nacos source code, it should be noted that Nacos 3.0 normalizes the original server and console components into a single module, bootstrap, for unified management. Therefore, you can control the startup mode by selecting the nacos.deployment.type parameter with the following three values:
| Parameter Value | Description |
|---|---|
| merged | Start both the server and the console |
| server | Start only the server |
| console | Start only the console |
The following is a formal description of the general steps for packaging based on the Nacos 3.0 source code structure. To facilitate data exchange with the local Nacos 3.0 program, this article uses MySQL as the database. The steps are as follows:
Step 1: Pull the Nacos 3.0 Source Code
Clone the source code from the Nacos GitHub repository to your local machine. You can use the following Git command to complete this operation:
git clone https://github.com/alibaba/nacos.gitcd nacosStep 2: Build the Necessary Environment
The necessary environment for building Nacos 3.0 includes:
- 64-bit OS, supporting Linux/Unix/Mac/Windows. It is recommended to use Linux/Unix/Mac for executing test code.
- 64-bit JDK 17+; Download & Install
- Maven; It is recommended to use version 3.3.9 or higher.
- Since this article uses a MySQL database, make sure that the MySQL database is installed and running.
To verify whether the above environment is installed successfully, execute the following commands:
java -versionmvn -vmysql -VStep 3: Package Nacos 3.0
Navigate to the root directory of the Nacos project and execute the Maven command to compile and package the console and server-side code of Nacos.
The specific command is as follows:
cd nacosmvn clean install -Prelease-nacosAfter packaging, the distribution/target directory will contain the nacos-server-${version} directory, tar.gz, and zip files, used for direct execution and deployment respectively.
Step 4: Start Nacos-Bootstrap in Merged Mode
Add the following configuration to the Nacos/distribution/target/nacos-server-${version}/nacos/conf/application.properties file:
spring.sql.init.platform=mysqldb.num=1db.url.0=jdbc:mysql://127.0.0.1:3306/nacos?characterEncoding=utf8&connectTimeout=1000&socketTimeout=3000&autoReconnect=true&useUnicode=true&useSSL=false&serverTimezone=UTCdb.user=${MYSQL_USERNAME}db.password=${MYSQL_PASSWORD}Start Nacos-bootstrap and specify the nacos.deployment.type parameter as merged. The startup command is as follows:
distribution/target/nacos-server-${version}/nacos/bin/startup.sh -m standalone -d mergedOn first launch, the system will prompt you to configure authentication parameters such as
nacos.core.auth.plugin.nacos.token.secret.key,nacos.core.auth.server.identity.key, andnacos.core.auth.server.identity.value. Follow the instructions to complete them.
Step 5: Verify Whether Nacos-Bootstrap Has Started Successfully
Access http://127.0.0.1:8080 in your browser. If a login page appears, it means that Nacos-Bootstrap has started successfully.
Local IDEA Startup
Add VM options
-Dnacos.standalone=true -Dnacos.deployment.type=merged-Dspring.profiles.active=dev--add-opens=java.base/java.lang=ALL-UNNAMED--add-opens=java.base/java.lang.reflect=ALL-UNNAMED--add-opens=java.base/java.util=ALL-UNNAMED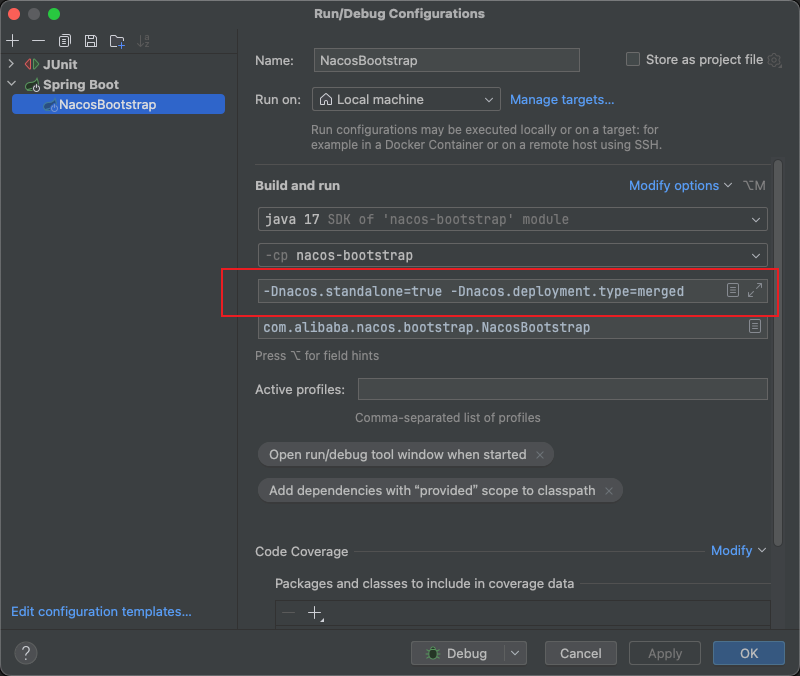
Explanation
The above steps start from pulling the Nacos source code, packaging Nacos-bootstrap, and starting the nacos-server.jar. Throughout the process, we have complied with the requirements of the open-source license and made no modifications or deletions to the original copyright information. By directly running the packaged JAR file, you can easily start the Nacos Server and Nacos console for testing or deployment.
It is worth mentioning that in actual operations, you may need to modify the commands and the content in the configuration file according to your own needs (such as the external MySQL database address, username, and password in this article).
---------------
Reference Links
How to Package the Nacos Source Code
---------------